Welcome to plansplaining, part 32, where we once more look at cursors. We already discussed the basics, and looked at static cursors and dynamic cursors. It is now time to cast our gaze upon the keyset cursor. The keyset cursor is sort of in between the static cursor (which presents a snapshot of the data is at was when the cursor was opened and disregards future changes) and the dynamic cursor (that always shows the current data). To be precise, a keyset cursor sees changes made to already existing rows, but does not see new rows that were added after the cursor was opened.
Keyset cursor
Let’s once more use the same sample code in the previous posts, but now change the cursor type to KEYSET instead of STATIC or DYNAMIC.
DECLARE MyCursor CURSOR
                 GLOBAL
                 FORWARD_ONLY
                 KEYSET
                 READ_ONLY
                 TYPE_WARNING
FOR
SELECT     soh.SalesOrderID,
           soh.OrderDate,
           sod.SalesOrderDetailID,
           sod.OrderQty,
           sod.ProductID,
           p.ProductID,
           p.Name
FROM       Sales.SalesOrderHeader AS soh
INNER JOIN Sales.SalesOrderDetail AS sod
   ON      sod.SalesOrderID        = soh.SalesOrderID
INNER JOIN Production.Product     AS p
   ON      p.ProductID             = sod.ProductID
WHERE      soh.SalesOrderID  BETWEEN 69401 AND 69410
AND        sod.OrderQty           >= 10
ORDER BY   p.ProductID;

OPEN MyCursor;
FETCH NEXT FROM MyCursor;
FETCH NEXT FROM MyCursor;
CLOSE MyCursor;
DEALLOCATE MyCursor;
I will also, as before, look at the execution plan only, without executing the query and without collecting run-time statistics.
 (Click on the picture to enlarge)
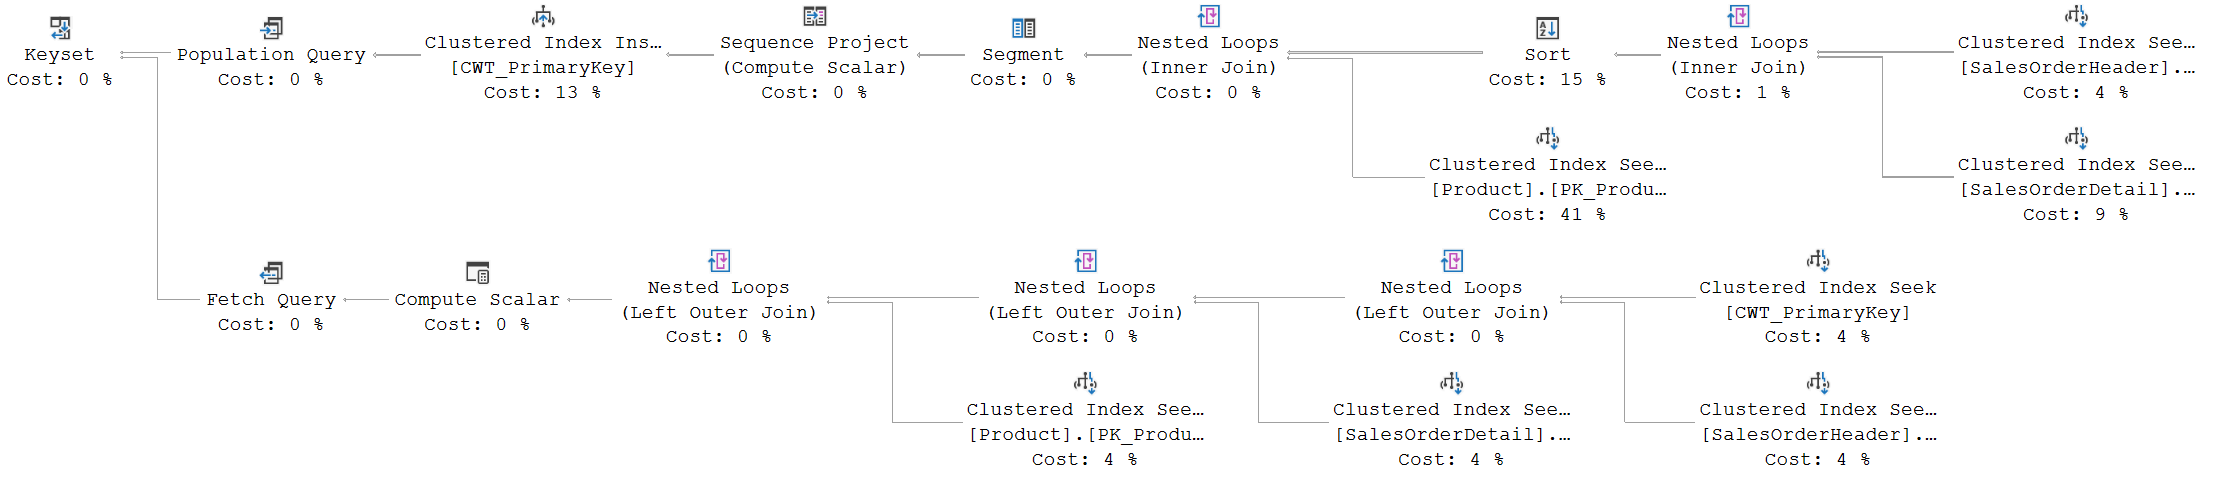
The Population Query looks, at first sight, identical to the population query that we saw for a static cursor. The Fetch Query, though, is a lot more complex in this case. We’ll look at the details later, but let’s start with a more detailed look at the Population Query.
Population Query
As already mentioned, the Population Query for the keyset cursor looks at first sight to be identical to that for the static cursor. But beware! You should never just look at the graphical representation of an execution plan. Always check the properties as well. If you do so, especially when you do it side by side with the execution plan from the post on static cursors, you will quickly notice some interesting differences.
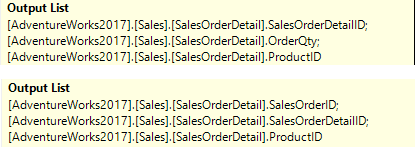 The first difference is that each of the three Clustered Index Seek operators now returns a different list of columns. The screenshot on the right shows the Output List properties of the Clustered Index Seek on SalesOrderDetail, for the static cursor (top) and for the keyset cursor (bottom). The OrderQty column is no longer returned. Instead, the SalesOrderID column is now returned. If you go through the two execution plans and look at the properties of the other two Clustered Index Seek operators yourself, you will see similar differences there.
It is also interesting to see that some columns are now returned twice. The Nested Loops that combines data from SalesOrderHeader and SalesOrderDetail receives a SalesOrderID from both inputs. They are, of course, by definition the same value – that is after all what the join operator does for an Inner Join Logical Operation. So the same value is now included in the data stream twice, albeit coming from different sources.
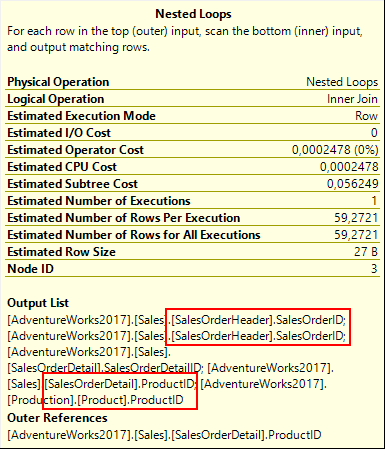 The Nested Loops to the immediate right of the Segment operator then does the same for the ProductID column: it already has that column from SalesOrderDetail in its top input, and then adds Product.ProductID from the bottom input, to output both copies in its Output List. Even more interesting is that, while the output of this operator still includes both copies of the SalesOrderID column that it receives from its top input, it is now two copies of the same column, from the SalesOrderHeader table. As mentioned before, this column is by definition equal to the one from SalesOrderDetail, so it doesn’t make any real difference. It’s just an interesting insight into the wondrous things that happen inside the query optimizer.
Obviously, when different columns are read from the index, then this also means that the list of columns received by the Clustered Index Insert, that populates an internal temporary table named tempdb.CWT_PrimaryKey, is different. And that, in turn, means that different columns will be inserted into that temporary table.
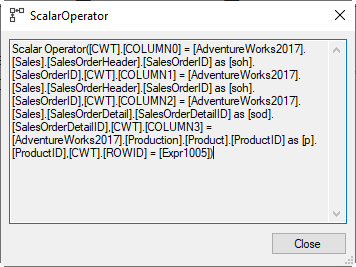 Remember, for the static cursor, the data inserted into CWT_PrimaryKey was the exact data that would be returned by the query in the DECLARE CURSOR statement, plus one additional column that holds a sequential row number, computed by the Sequence Project operator. The screenshot is hard to read, due to the extra parentheses, brackets, and fully qualified names. The short version is that both COLUMN0 and COLUMN1 are populated from the SalesOrderID column from SalesOrderHeader, COLUMN2 is the SalesOrderDetailID column from SalesOrderDetail, and COLUMN3 is ProductID from the Product table. The ProductID from SalesOrderDetail is also passed into this Clustered Index Insert, but not used. Again, this is not relevant, since the two ProductID columns are by definition equal in each row.
Putting all this together, we can now conclude that the Population Query did not execute the specified query and store the results, as would have been the case for a static cursor. Instead, it executes a slightly modified version of the query, that looks roughly like this:
SELECT     soh.SalesOrderID                          AS COLUMN0,
           sod.SalesOrderID                          AS COLUMN1,
           sod.SalesOrderDetailID                    AS COLUMN2,
           p.ProductID                               AS COLUMN3,
           ROW_NUMBER () OVER (ORDER BY p.ProductID) AS ROWID
INTO       tempdb.dbo.CWT_PrimaryKey
FROM       Sales.SalesOrderHeader AS soh
INNER JOIN Sales.SalesOrderDetail AS sod
   ON      sod.SalesOrderID        = soh.SalesOrderID
INNER JOIN Production.Product     AS p
   ON      p.ProductID             = sod.ProductID
WHERE      soh.SalesOrderID  BETWEEN 69401 AND 69410
AND        sod.OrderQty           >= 10
ORDER BY   p.ProductID;
In this specific case, the overall shape of the execution plan was not affected by the change in the SELECT list. We only noticed the change when we looked at the properties. But for other queries, the change to the SELECT LIST that is made for a keyset cursor can actually affect the operators used, for instance because there might be an index that is covering for one of the two queries, but not covering for the other version.
So now we know how the Population Query for a keyset cursor differs from that of a static cursor. It still finds the rows that match the query’s WHERE and JOIN clauses, but instead of storing the required columns, it stores the key columns of each table that is used in the query. This is, of course, where this cursor type gets its name. The result set of the query above is a set of all the relevant key values. A keyset.
Fetch Query
 For the Fetch Query, we see that queries call each other left to right, as usual, until the Clustered Index Seek on the far right, on CWT_PrimaryKey, is reached. This Clustered Index Seek reads from the temporary table that was created and populated by the Population Query, retrieving the columns we stored there, into columns that are creatively called COLUMN0, COLUMN1, COLUMN2, and COLUMN3 (for, respectively, SalesOrderID, SalesOrderID again, SalesOrderDetailID, and ProductID). The Seek Predicates property shows that, just as for a STATIC cursor, the row to read is determined by comparing the ROWID column to the function FETCH_RANGE(0).
Note that, unlike the static cursor, keyset does allow you to change the read direction from FORWARD_ONLY to SCROLL, so that you can use all of the fetch options (FETCH FIRST, FETCH NEXT, FETCH LAST, FETCH PRIOR, FETCH ABSOLUTE n, and FETCH RELATIVE n) to jump around in the data. This does not affect the execution plans in any way, though. SQL Server simply computes the correct row number to retrieve in the FETCH_RANGE(0) function, which then causes the top left Clustered Index Seek to return the correct row from CWT_PrimaryKey.
The rest of the execution plan looks, at first sight, very unsurprising. A Nested Loops operator into a Clustered Index Seek on SalesOrderHeader, to retrieve the SalesOrderID and OrderDate columns, based on COLUMN0 (the SalesOrderID from the Fetch Query). It might seem a bit superfluous to return SalesOrderID here – after all, it has by definition the same value as COLUMN0. But since the SELECT list of our query includes this column, it is returned. There is no gain in using COLUMN0 instead.
The rest of the execution plan then uses the same pattern to read the current SalesOrderID, ProductID, and OrderQty from the SalesOrderDetail table, and the current ProductID and Name from the Product table.
This is effectively the KEYSET logic at work. We do not want to see new rows, so we use the previously stored set of key values to drive the cursor. But we do want to see all other changes, so we then use those key values to read the current values of the data. So if you update the OrderQty of a SalesOrderDetail row after opening the cursor but before fetching that row, you will see the new value.
Updating a join column
An interesting thing happens when it is the ProductID column in the SalesOrderDetail table that is changed. You can see this by modifying the sample code as follows. (Note that I enclose it all within a transaction, to prevent permanent change to the AdventureWorks database – you can of course also remove the transaction and then later restore the database from a backup, or download a fresh copy from Microsoft).
BEGIN TRANSACTION;
GO
DECLARE MyCursor CURSOR
                 GLOBAL
                 FORWARD_ONLY
                 KEYSET
                 READ_ONLY
                 TYPE_WARNING
FOR
SELECT     soh.SalesOrderID,
           soh.OrderDate,
           sod.SalesOrderDetailID,
           sod.OrderQty,
           sod.ProductID,
           p.ProductID,
           p.Name
FROM       Sales.SalesOrderHeader AS soh
INNER JOIN Sales.SalesOrderDetail AS sod
   ON      sod.SalesOrderID        = soh.SalesOrderID
INNER JOIN Production.Product     AS p
   ON      p.ProductID             = sod.ProductID
WHERE      soh.SalesOrderID  BETWEEN 69401 AND 69410
AND        sod.OrderQty           >= 10
ORDER BY   p.ProductID;

OPEN MyCursor;
-- Modify second row returned, after the cursor is opened but before it is fetched
UPDATE Sales.SalesOrderDetail
SET    ProductID          = 708
WHERE  SalesOrderID       = 69401
AND    SalesOrderDetailID = 102392;
-- Look at the data returned by the second FETCH!
FETCH NEXT FROM MyCursor;
FETCH NEXT FROM MyCursor;
CLOSE MyCursor;
DEALLOCATE MyCursor;
GO
-- Undo data changes
ROLLBACK TRANSACTION;
Here is a screenshot of the results returned by the second FETCH statement on my machine:

If you ever wondered, during the previous episodes of this series, why I have included the ProductID column twice in the SELECT list, this is the reason. In the screenshot above, you can see that the column defined as sod.ProductID is 708 (which is correct, after the update), but the column defined as p.ProductID still shows the original key value, p.ProductID. By listing these two columns side by side, you can detect that the ProductID in the SalesOrderDetail table was changed after the cursor was opened.
Be very aware, in cases such as this, that the Name column is still the (current) name for the original ProductID! ProductID 708 is not named “Sport-100 Helmet, Blue”, nor did it ever have that name. If you remove the p.ProductID column from the SELECT list in the DECLARE CURSOR statement, the data returned becomes rather misleading. And if you leave p.ProductID in but remove sod.ProductID, then it is misleading in another way. This is definitely a side effect of SQL Server’s very literal implementation of the definition for keyset cursors that you need to be aware of when working with keyset cursors that are based on a join!
Deleting a row
Since a keyset cursor sees all changes to the data except new rows, we also need to consider what happens when some data is deleted. So let’s once more modify the test code a bit, this time to delete the SalesOrderDetail row for the data that would be returned by the second FETCH statement:
BEGIN TRANSACTION;
GO
DECLARE MyCursor CURSOR
                 GLOBAL
                 FORWARD_ONLY
                 KEYSET
                 READ_ONLY
                 TYPE_WARNING
FOR
SELECT     soh.SalesOrderID,
           soh.OrderDate,
           sod.SalesOrderDetailID,
           sod.OrderQty,
           sod.ProductID,
           p.ProductID,
           p.Name
FROM       Sales.SalesOrderHeader AS soh
INNER JOIN Sales.SalesOrderDetail AS sod
   ON      sod.SalesOrderID        = soh.SalesOrderID
INNER JOIN Production.Product     AS p
   ON      p.ProductID             = sod.ProductID
WHERE      soh.SalesOrderID  BETWEEN 69401 AND 69410
AND        sod.OrderQty           >= 10
ORDER BY   p.ProductID;

OPEN MyCursor;
-- Modify second row returned, after the cursor is opened but before it is fetched
DELETE Sales.SalesOrderDetail
WHERE  SalesOrderID       = 69401
AND    SalesOrderDetailID = 102392;
-- Look at the data returned by the second FETCH!
FETCH NEXT FROM MyCursor;
FETCH NEXT FROM MyCursor;
SELECT @@FETCH_STATUS AS FetchStatus;
CLOSE MyCursor;
DEALLOCATE MyCursor;
GO
-- Undo data changes
ROLLBACK TRANSACTION;
Running this code on my laptop returns these three result sets (from the two FETCH statements, plus the final fetch status):

You might have expected that the columns from the SalesOrderHeader and Product tables would still show data, and only the columns from SalesOrderDetail would still be there. But as you see, that is not the case. The row we deleted is still in the keyset. But it is no longer in the current data. And since we have to show current data for the rows in the keyset (that existed when the cursor was opened), we cannot show data for this row. That is in this case not represented by setting all columns to NULL values, but by setting them to the initial value for each datatype – the reason for this is that the data types but also nullability for all columns are determined by looking at the query logic, and these columns are all not nullable. If you change one or both INNER JOINs to LEFT OUTER JOINs, then you will see that the columns from those tables will now be NULL.
However, the data in these columns is not even significant. When working with a KEYSET cursor, you must always check the FETCH_STATUS. If it is -2, it means that the row no longer exists in the result set, and hence the data returned is irrelevant.
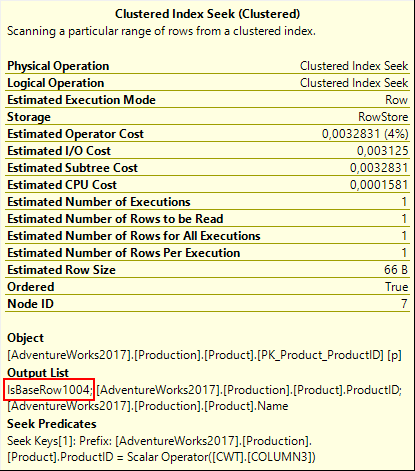 But how is this logic handled by the execution plan? To understand that, we need to look in detail at the Output List property of each of the Clustered Index Seek operators on the three base tables. Depicted to the right is the property list for the Clustered Index Seek on the Product table, but you will see the same pattern in the two other Clustered Index Seeks.
I mentioned before that this Clustered Index Seek returns the ProductID and Name columns. But if you check, you will see that a third column is returned, with the mysterious name IsBaseRow1004. There is no definition for this column, not even in the Defined Values property in the full property list. It is simply listed, and not defined in any way. Because of this, I do not know what exactly is in this column. The only thing I know, based on my analysis of the rest of the plan, is that IsBaseRow1004 (and also IsBaseRow1002 and IsBaseRow1003) are set to a fixed non-null value.
The second part of the puzzle is that all Nested Loops operators in the Fetch Query use Left Outer Join as their Logical Operation. So when no row is returned by the Clustered Index Seek (because it was deleted after the Population Query), the input data is still passed on to the parent operator, with NULL values for the columns that come from the bottom input.
You can see this in the execution plan with run-time statistics for the second FETCH. If you enable that option and run the code again, then the execution plan for that statement only looks like this:

(Click on the picture to enlarge)
As you can see, the Clustered Index Seek operator on SalesOrderDetail did not return a row, whereas the other Clustered Index Seek operators still did return the expected row. So the data in the row returned by the leftmost Nested Loops to the Compute Scalar operator consists of the current values in the tables for the columns from SalesOrderHeader and Product, NULL values for the columns from SalesOrderDetail, and also the unknown non-null value for IsBaseRow1002 and IsBaseRow1004, but null for IsBaseRow1003.
 And that is where the final piece of the puzzle comes in. The Compute Scalar computes one new column, from those three IsBaseRow column, with the expression you see on the right. All three IsBaseRow columns have to be NOT NULL in order for Expr1006 to be set to 1. If just one of them, or two, or even all three, is NULL, then Expr1006 will be 0 instead.
This Expr1006 value is returned to the Fetch Query pseudo-operator, but not returned to the client. It is used internally to do the final bit of handling. When Expr1006 is 1, all data was found. All values returned by Compute Scalar are passed to the client, and @@FETCH_STATUS is set to 0 to indicate success. But if Expr1006 is 0, then at least one row as indicated by the key values in the keyset no longer exists. @@FETCH_STATUS is set to -2, and for good measure, SQL Server also sets all columns to NULL where possible, and to the initial value for the datatype where not.
Summary
The behavior of a KEYSET cursor is somewhat in between that of STATIC and DYNAMIC. And the same goes for its implementation.
Just like a STATIC cursor, a KEYSET cursor executes its query when the OPEN CURSOR statement executes, and saves the results. However, instead of saving the columns that are included in the SELECT list of the query, it saves the primary key values of the base table’s rows.
The FETCH then uses the same positioning mechanism that we already discussed in the episode on STATIC cursors to find the next row (in a FORWARD_ONLY cursor) or the specifically requested row (in a SCROLL cursor). It then uses the key values from that row to find the current data. This can cause interesting and perhaps unexpected effects when a join column has been updated. When one or more of the referenced rows no longer exist, the execution plan detects this, so that the FETCH_STATUS will be set to -2.
We only have one more cursor type left to explore, and that is the FAST_FORWARD cursor. This will be the topic of the next part.
As always, please let me know if there is any execution plan related topic you want to see explained in a future plansplaining post and I’ll add it to my to-do list!


1 Comment. Leave new
[…] Hugo Kornelis talks about a cursor I’d never heard of before: […]