Welcome to part thirteen of the plansplaining series. In this part I continue the exploration of how execution plans check foreign keys on data modification.
In the previous part, we looked at foreign key checking when data is inserted. Inserts in the referencing (child) table can, by definition, not cause foreign key violations, so no checking is done in those cases. But for inserts in the referenced (parent) table, SQL Server needs to check that the inserted value does indeed exist. We saw how both the Nested Loops and the Merge Join operators have some specific optimizations to do that check as efficient as possible; we also saw how the Assert operator does the actual checking.
When deleting data, the reverse is true. We can delete rows from the child table without verification, but deletes from the parent table are subject to a check.
Sample tables
I’ll continue to use the same example scenario as in the previous post. Run the code below to create the Suppliers and Products tables, and put in some sample data.
DROP TABLE IF EXISTS dbo.Products, dbo.Suppliers;
GO
CREATE TABLE dbo.Suppliers
    (SupplierID   int         NOT NULL,
     SupplierName varchar(50) NOT NULL,
     CONSTRAINT PK_Suppliers
         PRIMARY KEY (SupplierID));

CREATE TABLE dbo.Products
    (ProductCode char(10)    NOT NULL,
     ProductName varchar(50) NOT NULL,
     SupplierID  int         NULL,
     CONSTRAINT PK_Products
         PRIMARY KEY (ProductCode),
     CONSTRAINT UQ_Products_ProductName
         UNIQUE (ProductName),
     CONSTRAINT FK_Products_Suppliers
         FOREIGN KEY (SupplierID)
         REFERENCES dbo.Suppliers (SupplierID),
     INDEX ix_Products_SupplierID NONCLUSTERED (SupplierID));

INSERT dbo.Suppliers (SupplierID, SupplierName)
VALUES (1, 'Supplier 1'),
       (2, 'Supplier 2'),
       (3, 'Supplier 3'),
       (4, 'Supplier 4'),
       (5, 'Supplier 5'),
       (6, 'Supplier 6');

INSERT dbo.Products (ProductCode, ProductName, SupplierID)
VALUES ('Prod 1', 'Product number 1', 1),
       ('Prod 2', 'Product number 2', 2),
       ('Prod 3', 'Product number 3', 3),
       ('Prod 4', 'Product number 4', 4),
       ('Prod 5', 'Product number 5', 5),
       ('Prod 6', 'Product number 6', 1),
       ('Prod 7', 'Product number 7', NULL),
       ('Prod 8', 'Product number 8', 2),
       ('Prod 9', 'Product number 9', 3);
Note that this is the exact same data from the previous post. If you followed along with the code in that post and haven’t removed the tables since, you do not need to run this code now.
Let’s remove a row
Because of the foreign key constraint, some suppliers cannot be removed. However, supplier number 6 does seem redundant. Let’s get rid of this row:
DELETE dbo.Suppliers
WHERE  SupplierID = 6;
I ran this query, and this was the execution plan plus run-time statistics (aka “actual execution plan”):
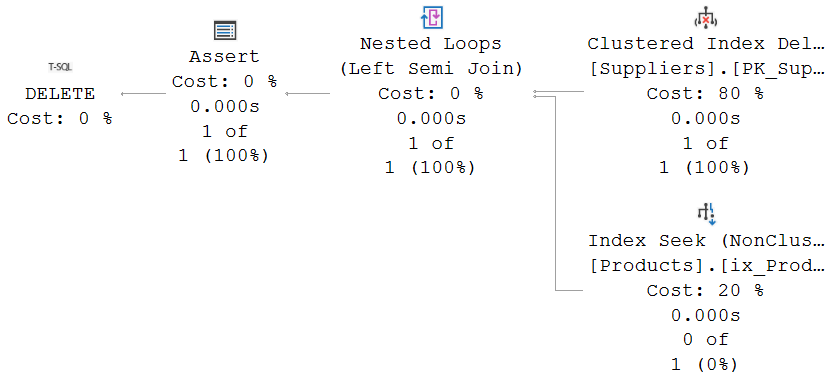
The Clustered Index Delete operator can use choose between two methods for finding the rows to delete. It can use a Predicate property on the leading column(s) in the index to directly find the rows to be deleted, or it can read rows from a child operator and then delete rows based on the index key values in those rows. In this case, because the query uses a simple predicate on the clustered index column, it uses the former method.
Check that foreign key
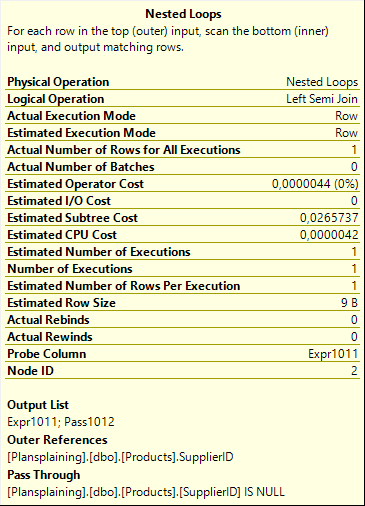
The pattern used for the foreign key check is very similar to the pattern used when inserting data in the child table. The Nested Loops operator does a probed Left Semi Join into an Index Seek on the Products table. This checks whether any products exist with the SupplierID value that has just been deleted. Because it is a semi join, it reads only a single matching row from the Products table, even if there are more. Note that if I had not created an index on the SupplierID column in the Products table, this operator would have changed to a Clustered Index Scan, with a pushed down Predicate property. Which of course would be far less efficient!
In the insert plan, we saw a Pass Through property to bypass the check when a NULL value is inserted and a check is therefore not relevant. That property is not used here, for the simple reason that the SupplierID column in the Suppliers table is not nullable. However, even when I set up an esoteric (and very unrecommended!!) scenario where a foreign key constraint targets a nullable column in the parent table, the execution plan for a delete statement still doesn’t use the Pass Through property. This can, in some cases, cause a small performance overhead that could be avoided. It cannot cause errors, though. The foreign key scan is to verify that the child tables has no matching rows. For a NULL SupplierID, there can never be any matching rows; so in that case there is no need (except a few wasted CPU cycles) to bypass the semi join operation.
The Assert operator is where an error is thrown when the foreign key is violated. It does not have to check any pass-through column; it only checks the probe column and forces an error when any matching row was found in the child table.
We want more (or less)
Trying to delete all data will of course fail. At least one of the remaining suppliers still has products. (All of them, in fact, but just one is enough to make the statement fail).
DELETE dbo.Suppliers;
But we can still look at the execution plan, simply by asking for the execution plan only, without executing the query:
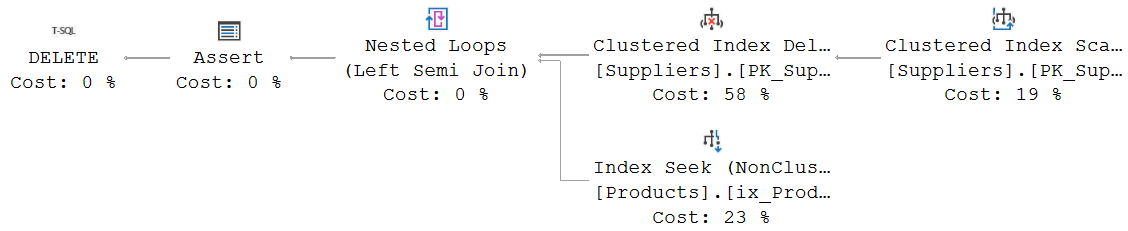
The only difference with the previous execution plan is the addition of a Clustered Index Scan, as the child of the Clustered Index Delete. Remember, a Clustered Index Delete can either search for its own rows to delete, based on a Predicate property; or it needs to get the rows to delete from a child operator. In this case, there is no WHERE clause in the query that can be used as the Predicate property, so only the second option is available.
The rest of the execution plan is exactly the same as the previous one.
If you add enough rows to the Supplier and Products table first, then try this delete statement again, you will eventually reach the tipping point where the optimizer moves away from the Nested Loops approach and instead uses a Merge Join, but still as a probed Left Semi Join. The lower input then obviously is no longer an Index Seek; it changes to an Index Scan, with the Ordered property set to True, to ensure rows are returned in the order the Merge Join expects.
None of this is really very interesting. Let’s try something else.
Time for a change
We looked at inserts. We looked at deletes. Time to look at the UPDATE statement, right?
DECLARE @a int = 3;
UPDATE dbo.Products
SET    SupplierID = @a
WHERE  ProductCode LIKE 'Prod 5%';
Run this query to change the supplier for product 5 from 5 to 3 with the execution plan plus option enabled, and you will get this execution plan:
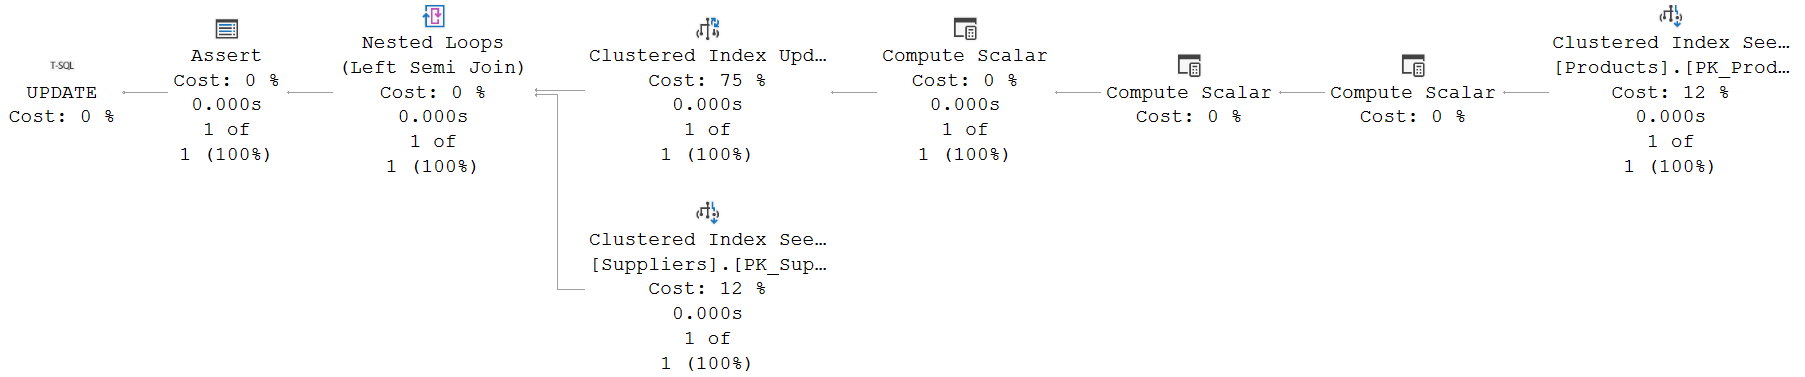
The Clustered Index Seek on the right simply fetches the rows to be updated, based on the WHERE clause (that gets translated to a Seek Predicates property that encompasses the entire range that might match the LIKE filter, plus a Predicate property to prevent false matches that might e.g. happen due to specific collation weirdness).
So many computations!
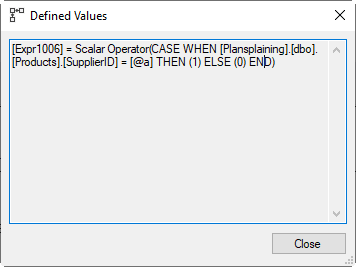 The rows that need to be updated then go through three Compute Scalar operators. The one on the far right is the most interesting of the three. The screenshot here shows its Defined Values property. It compares the SupplierID value from the row to be updated to @a, the value it will be set to. Remember that the data passing through this operator is the original data, before the update. So this test effectively tests whether the current value is actually already the same as the new value. Expr1006 is set (1) if the row to be updated will not really change, and reset (0) if there is a real change.
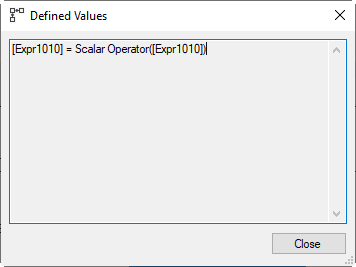
The next Compute Scalar is a bit curious. It computes a new expression, Expr1010, as “CASE WHEN Expr1006 THEN 0 ELSE 1 END”. This is actually equivalent to “NOT (Expr1006)”. So Expr1010 is the reverse of Expr1006: it is True if the row to be updated WILL change, and False if the new value is the same.
 The third Compute Scalar is the weirdest of them all: it simply sets Expr1010 equal to itself. This appears totally useless. To understand this, you need to realize that most Compute Scalar operators do not actually run; they are in the execution plan as a container to store the definition of a computation; the actual computation is delayed until the column is actually used, by one of the other operators in the execution plan. But this Compute Scalar does actually execute, as can be seen from the fact that it reports run-time statistics, whereas the others don’t. The next operator will actually modify the SupplierID value in the current row, but the formula for Expr1010 depends (indirectly) on this value. After the update, the original value is no longer available. So to ensure that Expr1010 is and remains correct, this Compute Scalar materializes the value. Now, any further references to Expr1010 will use the materialized version, and not be affected by the update to the SupplierID value in the row.
Update and verify
The rest of the execution plan offers no surprises. The Clustered Index Update has an Object property that lists not only the clustered index, but also the nonclustered index. So just as in the previous episode when I inserted new rows, the optimizer chooses to use a narrow plan for index maintenance in this case, based on the estimated number of rows.
The Predicate property of the Clustered Index Update shows the columns to be updated, and their new values. No surprises there.
If you expected to see any condition referencing Expr1010, to skip the update for any row where the new value happens to be the same as the original value, you’d be wrong. The update will always be done. This is by design. There are some ALTER TABLE modifications that execute as a metadata change only, and will not rewrite the rows until an update touches the row. Running an update to set a column to what it was is in those cases a simple method to force the actual data to be updated and take the cost at a controlled moment. So it cannot simply bypass the update here.
After updating the data, the row is once more passed to a Nested Loops operator, for a probed Left Semi Join to check that the new value of SupplierID exists. This works exactly the same as we saw in the previous post for an insert statement. This actually makes sense. An update is, conceptually, the same as a delete and an insert. The old (deleted) value needs no checking. The new (inserted) value does. So it can be checked with the same logic.
 This means that, just as with the execution plan for the insert, The Nested Loops operator does in this case use the Pass Through property, as shown in the screenshot to the right. When the new value of the SupplierID column is NULL, the Foreign Key restriction does not apply. The Clustered Index Seek on the inner input of the Nested Loops would not find a row, but that’s okay in this case; and the check is bypassed.
Here, again, you might be forgiven for expecting to see the Expr1010 value used as well. After all, if the SupplierID value has not actually changed, why bother to check that the value exists? This is because there are scenarios where existing data violates the constraint. It is possible, and allowed, to disable the foreign key constraint, modify the data, then enable the foreign key again. If the WITH CHECK option is not used when re-enabling the foreign key, it becomes untrusted: SQL Server assumes that some of the existing data might be in violation of the constraint. In that case, setting a value equal to itself should not bypass the test, after all, the constraint is active now and all modifications need to be tested. The old data might be in violation; after the change it has to be checked. In our case, the constraint was trusted and we could have used Expr1010 to save some performance overhead. But this is apparently a standard pattern that the optimizer always uses.
The Assert operator that does the final check holds no surprises. It uses the exact same formula as the Assert operator we saw in the previous post, when checking an insert statement. Yet more evidence that, for foreign key checking, SQL Server considers an update as the logically equivalent insert and delete; in this case only the insert can cause violations, and the execution plan pattern used to check those seems to be rather standard.
Conclusion
If a foreign key constraint exists, any delete to the referenced (child) table requires a check in the referencing (parent) table. After all, if the rows to be deleted are still referenced, the foreign key should protect them from deletion. We looked at how SQL Server builds this check into the execution plan for the delete statement.
We also looked at updates in the child table. When the foreign key column is changed, the new data needs to be checked, just as if it were inserted. And the execution plan revealed that the mechanics used are, indeed, just as they are for insert statements. So no surprises there.
We have not yet looked at updates in the parent table. I had planned to cover that as well, but as I was writing I realized the post became too long even by my standards. Updating the parent is by itself interesting (and complicated) enough to warrant a post of its own. So stay tuned: soon I will add the final part 3 of this mini-series.


2 Comments. Leave new
[…] already looked at inserting data in the referencing (child) table, and at deleting data from the referenced (parent) table as well as updates in the child table. We did not and will not […]
[…] to part fifteen of the plansplaining series. In the three previous parts I looked at the operators and properties in an execution plan that check a modification […]